OK after a week with the flu and 103º fever here we go with Part 2 of behind the scenes look at the CA Trip – for those of you who are jumping in now here is a link to Part 1 and the resulting video from this trip. For those of you who want to get right to it – go ahead and watch the video below. After the video I’ll share some of my insight into Time Lapse Photography, as well as share some tips and trick in the use of sliders for both live action and time lapse.
Mono Lake from Vincent Laforet on Vimeo.
Part I – Basic Time Lapse:
I think time lapse photography (from heron out referred to as TL) holds a special place in most photographers’ hearts for a very specific reason: it’s the cleanest, least painful transition from still photography into motion. The beauty of it is that you can use your existing still camera, lenses, filters, and tripod and get great results right off the bat. Other than a triggering device (the official Canon one here, Nikon one here, or knock of versions) – there isn’t much to buy. I’ve in fact used my Pocket Wizards as well (only makes sense economically if you already own them of course.) I’ve put an entire gear section for all of the gear mentioned in this article HERE by the way.
The basic fundamentals apply as well: compose the perfect shot, and let nature do its thing. Just sit back and hope for the best. It’s actually quite a relaxing process. You need to keep in mind that all of the hard work w/ time lapse photography is done PRIOR to the first frame being fired. Once you start – there’s nothing for you to do. You should never touch, change or approach the camera as you might bump the camera and mess up your framing and ruin the entire time lapse (or cast your shadow/and/or have your reflection show up in one of the objects.) It’s not uncommon for me to surround my tripod with physical obstacles so that lookie loos can’t inadvertently walk in front of the camera, or worse up to the camera to "take a peek." Curiosity always kills the cat – and in this case a well planned out time lapse.
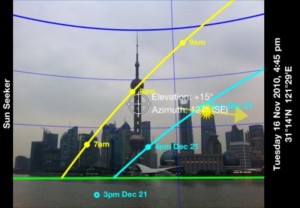
Speaking of planning – you should be doing a lot of it PRIOR to setting up your camera. Use apps such as Sunseeker to find where the sun will rise and set. While it’s nice to have the sun in your frame (in front of you) I find that many of my favorite time lapses happen when the sun is at a noticeable angle relative to the direction the camera is pointed in. I almost never want to have the sun to my back for two reasons: the first is obvious – I don’t want the camera’s shadow in the frame and 2. the environment will look relatively flat with that type of light. It’s much more fun to see the light moving over time and that will be more dramatic if it’s at a 90º angle from the camera. That will also enhance your use of a Circular Polarizer as well – if you’re using one. If you’ve ever seen deep blue water, dark skies, and or lush green foliage in photographs/TL – it’s very likely that a Circular Polarizer was used… As you plan out your shot – think of how the light will move, where the shadows will fall, and try to predict the result. You can lock your camera down in Manual mode – or go in Aperture priority. I tend to do the latter when I expect a wide exposure change such as sunset into night. Whenever possible I recommend you shoot in manual exposure mode – especially if you’re not going from day to night or vice versa – and especially if you’re going to introduce a move in there somewhere and can expect a resulting exposure fluctuation. There are a number of 3rd party devices that will allow you to ramp exposure gradually as well. I never use shutter priority as I don’t want the Aperture changing during the exposure. I’ve also had great success in After Effects with the following AE plugin (GB Deflicker) to reduce any pulsating / flicker from the auto exposure mode on the camera.
 Ultimately – the way the light moves, and/or your composition will determine the success of your time lapse. Truth be told though – what will make it sing is something unexpected. An incredible sky at sunset never hurts… a great reflection… and unexpected burst of light and the resulting shadow…. dust picking up… blue skies are not your friend in general – you’ll learn to LOVE CLOUDS again. Bad weather pulling in can lead to great successes (unless it starts to rain of course – but that can work too…)
As you frame your shot, you should have a clear goal. If you’re expecting an amazing sky / clouds – shoot a bit looser. Remember you are shooting a high resolution still – you can easily crop into it during post. But in general – tighter is always right. I very often shoot with two cameras side by side – one with a wider lens then the other (or perhaps one with a tilt shift lens.) With all the effort you put into getting a time lapse shot – why not shoot a second camera if you have the extra gear? Can’t decide on the perfect exposure? Shoot both with 2 different cameras!
Make sure to remember that in 1080p 16X9 you’re going to crop the top and bottom of your still – that’s VERY important to remember. I’ve put gaffer tape on my LCD or left my camera in video "live view" to see the grey markers on the screen to help me there.
I’ve also started to use the Zacuto EVF to compose my shots – it’s incredibly useful for several reasons: 1. you can more easily perfect your composition when your camera is in a position low on the ground or one that you can’t physically get to. 2. It allows you to watch the full range of the motion through the EVF and in effect get a preview of the final move live. 3. it blocks out all of the glare / reflections form the environment around you. 4. You get a more realistic view of the final shot w/ the Polarizer/ filters and exposure taken into account. 5. it’s a lot easier to plug in an EVF and go from camera to camera (or to leave if plugged in) and to take a peak every once in awhile through the EVF as the previews come up after each exposures (if you chose to leave that on – I generally do not) than it is to walk up to the camera and peak through the viewfinder, or play the time lapse by hitting the play button – as mentioned above: you never want to TOUCH your camera at all – if you can avoid it! I highly recommend this technique that I’ve recently stumbled upon… to some using an EVF may be excessive – to me it’s something I’ll be doing almost all of the time from now on.
Once you’ve chosen the right focal length, I recommend you gaffer tape the focus ring and zoom ring – so that there’s no chance of anything being bumped/changed during the shoot. Make sure you turn the "review" function off so that the LCD doesn’t come on during long exposures and possibly affect your exposure at night.
A good set of sticks/tripod never hurt anyone either. The heavier the better – and I recommend you use sandbags and/or hangyour full camera bag off of the tripod to give it weight. Avenger makes ones that you can travel with (empty) and fill with sand or other knick knacks that work quite well. This will help you fight off an inadvertent bump or wind. I recommend you pick a stable shooting platform – bridges ain’t good: they flex as trucks drive over them… noticeably.
You might also want to look into using a graduated ND filter – to darken the sky and level out the exposure with the lower part of your frame for example – especially if you’re shooting into the sun. If you’re doing astro-time lapse and/or long exposures, remember to lock your mirror up to avoid unnecessary vibrations.

