CA Trip Behind The Scenes Part 2 – Time Lapse/Live Action & Sliders
OK after a week with the flu and 103º fever here we go with Part 2 of behind the scenes look at the CA Trip – for those of you who are jumping in now here is a link to Part 1 and the resulting video from this trip. For those of you who want to get right to it – go ahead and watch the video below. After the video I’ll share some of my insight into Time Lapse Photography, as well as share some tips and trick in the use of sliders for both live action and time lapse.
Mono Lake from Vincent Laforet on Vimeo.
Part I – Basic Time Lapse:
I think time lapse photography (from heron out referred to as TL) holds a special place in most photographers’ hearts for a very specific reason: it’s the cleanest, least painful transition from still photography into motion. The beauty of it is that you can use your existing still camera, lenses, filters, and tripod and get great results right off the bat. Other than a triggering device (the official Canon one here, Nikon one here, or knock of versions) – there isn’t much to buy. I’ve in fact used my Pocket Wizards as well (only makes sense economically if you already own them of course.) I’ve put an entire gear section for all of the gear mentioned in this article HERE by the way.
The basic fundamentals apply as well: compose the perfect shot, and let nature do its thing. Just sit back and hope for the best. It’s actually quite a relaxing process. You need to keep in mind that all of the hard work w/ time lapse photography is done PRIOR to the first frame being fired. Once you start – there’s nothing for you to do. You should never touch, change or approach the camera as you might bump the camera and mess up your framing and ruin the entire time lapse (or cast your shadow/and/or have your reflection show up in one of the objects.) It’s not uncommon for me to surround my tripod with physical obstacles so that lookie loos can’t inadvertently walk in front of the camera, or worse up to the camera to "take a peek." Curiosity always kills the cat – and in this case a well planned out time lapse.
Speaking of planning – you should be doing a lot of it PRIOR to setting up your camera. Use apps such as Sunseeker to find where the sun will rise and set. While it’s nice to have the sun in your frame (in front of you) I find that many of my favorite time lapses happen when the sun is at a noticeable angle relative to the direction the camera is pointed in. I almost never want to have the sun to my back for two reasons: the first is obvious – I don’t want the camera’s shadow in the frame and 2. the environment will look relatively flat with that type of light. It’s much more fun to see the light moving over time and that will be more dramatic if it’s at a 90º angle from the camera. That will also enhance your use of a Circular Polarizer as well – if you’re using one. If you’ve ever seen deep blue water, dark skies, and or lush green foliage in photographs/TL – it’s very likely that a Circular Polarizer was used… As you plan out your shot – think of how the light will move, where the shadows will fall, and try to predict the result. You can lock your camera down in Manual mode – or go in Aperture priority. I tend to do the latter when I expect a wide exposure change such as sunset into night. Whenever possible I recommend you shoot in manual exposure mode – especially if you’re not going from day to night or vice versa – and especially if you’re going to introduce a move in there somewhere and can expect a resulting exposure fluctuation. There are a number of 3rd party devices that will allow you to ramp exposure gradually as well. I never use shutter priority as I don’t want the Aperture changing during the exposure. I’ve also had great success in After Effects with the following AE plugin (GB Deflicker) to reduce any pulsating / flicker from the auto exposure mode on the camera.
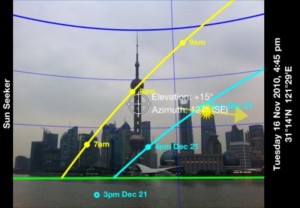 Ultimately – the way the light moves, and/or your composition will determine the success of your time lapse. Truth be told though – what will make it sing is something unexpected. An incredible sky at sunset never hurts… a great reflection… and unexpected burst of light and the resulting shadow…. dust picking up… blue skies are not your friend in general – you’ll learn to LOVE CLOUDS again. Bad weather pulling in can lead to great successes (unless it starts to rain of course – but that can work too…)
As you frame your shot, you should have a clear goal. If you’re expecting an amazing sky / clouds – shoot a bit looser. Remember you are shooting a high resolution still – you can easily crop into it during post. But in general – tighter is always right. I very often shoot with two cameras side by side – one with a wider lens then the other (or perhaps one with a tilt shift lens.) With all the effort you put into getting a time lapse shot – why not shoot a second camera if you have the extra gear? Can’t decide on the perfect exposure? Shoot both with 2 different cameras!
Make sure to remember that in 1080p 16X9 you’re going to crop the top and bottom of your still – that’s VERY important to remember. I’ve put gaffer tape on my LCD or left my camera in video "live view" to see the grey markers on the screen to help me there.
I’ve also started to use the Zacuto EVF to compose my shots – it’s incredibly useful for several reasons: 1. you can more easily perfect your composition when your camera is in a position low on the ground or one that you can’t physically get to. 2. It allows you to watch the full range of the motion through the EVF and in effect get a preview of the final move live. 3. it blocks out all of the glare / reflections form the environment around you. 4. You get a more realistic view of the final shot w/ the Polarizer/ filters and exposure taken into account. 5. it’s a lot easier to plug in an EVF and go from camera to camera (or to leave if plugged in) and to take a peak every once in awhile through the EVF as the previews come up after each exposures (if you chose to leave that on – I generally do not) than it is to walk up to the camera and peak through the viewfinder, or play the time lapse by hitting the play button – as mentioned above: you never want to TOUCH your camera at all – if you can avoid it! I highly recommend this technique that I’ve recently stumbled upon… to some using an EVF may be excessive – to me it’s something I’ll be doing almost all of the time from now on.
Once you’ve chosen the right focal length, I recommend you gaffer tape the focus ring and zoom ring – so that there’s no chance of anything being bumped/changed during the shoot. Make sure you turn the "review" function off so that the LCD doesn’t come on during long exposures and possibly affect your exposure at night.
A good set of sticks/tripod never hurt anyone either. The heavier the better – and I recommend you use sandbags and/or hangyour full camera bag off of the tripod to give it weight. Avenger makes ones that you can travel with (empty) and fill with sand or other knick knacks that work quite well. This will help you fight off an inadvertent bump or wind. I recommend you pick a stable shooting platform – bridges ain’t good: they flex as trucks drive over them… noticeably.
You might also want to look into using a graduated ND filter – to darken the sky and level out the exposure with the lower part of your frame for example – especially if you’re shooting into the sun. If you’re doing astro-time lapse and/or long exposures, remember to lock your mirror up to avoid unnecessary vibrations.
Lastly – you’ll need to choose your interval. I’d recommend shooting every 6 seconds as the most basic ballpark suggestion. That being said – you should do the following: decide how long you’re shooting for, and how long you’d like the end time lapse to last. So if you’d shooting for 24 minutes, and you shoot every 6 seconds, you’re getting 10 frames per minute. At the conclusion of your 24 minutes, you’ll have 240 frames total. If you play that back at 24 frames per second – you’ll have 10 seconds of running footage in the end… make sense? The chance of your playing the full 10 seconds is pretty rare – you’ll either speed the time lapse up in the end, or pick the best section of it. Shooting with more than a frame every six seconds will allow you to "ramp down" you shot at that point – i.e. slow down a certain key section and still have that section play pretty smoothly. I recommend shooting with 32GB cards for TL – and shoot ONLY in RAW! This will allow you to fight exposure fluctuations and color temperature changes in post. DO NOT SHOOT JPEGs! 16GB cards wlll work well with 14MP cameras and under – but 32GB will ensure you almost never run out of space on the 21MP 5D MKII – running out of space or battery power is the #1 killer of TLs – it always happens during the apex of the best time lapse in the world!!!! 🙂 I do not use sRAW for a number of reasons (artifacting) but notably NEVER when shooting stars as the interpolation can actually cancel out stars in astro-time lapse photography. If I nail a fantastic moment – I can also make a fine art print of it shot in full RAW. Not so in sRAW. Every time I’ve shot sRAW I’ve regretted it… but some of you may not have the CF/HD space and I can understand that. For me it’s just not worth the risk of nailing an amazing still image and not being able to make a 60X40 of it.
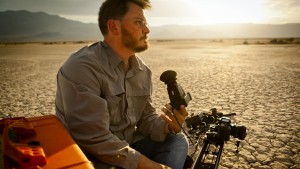 All you need to do then is to drop the still images into Aperture, Lightroom, Bridge – or simply into the free Quicktime 7 as an "image sequence" – and voila – you have video. You can "pan and scan" in post (i.e. zoom and pan / tilt) and get some very nice results in any video editing software as well. (OK – there’s a LOT more than goes into post… you can color correct your images in Aperture/Lightroom/Bridge and export them as JPEGs or TIFFs… at 1080p resolution or higher if you want to crop in and move around… but I’ll need to get into that in another series of posts…)
There are many ways to do this, but by far the best workflow for me is with Adobe After Effects. I’ll share it with you at some point – it’s pretty wicked what you can do in AE. You can blur out the water in a time lapse for example – incredibly effectively… I work straight off the RAW files with Adobe Camera RAW in AE.
It’s also not a bad idea to render quick JPEGs (or if you have space shoot RAW + JPEG in your camera) so that you can give a quick look at your time lapses at the end of the day to see if they were a success and if it’s worth rendering the hundreds or thousands of RAW files you shot…
PART II – Moving the Camera
I think it’s safe to say that you almost HAVE to move the camera these days during your time lapse. I say this because it feels like EVERYBODY is shooting time lapse these days. Technology has it made it so easy to do so. In order to stand out – you need to try something different. On a more basic level – if not much is moving within your frame – you really need to move the camera to compensate. If you can keep the camera in motion – you will truly be able to entrance your audience even more. That’s not to say you can’t get the most amazing time lapse with a still camera resting on a table … I’m simply offering up the idea that to "stand out" it helps to somehow move the camera itself during your series of exposures. Here is a series examples of time lapse where the camera is in motion that should help make this point for me – note that my favorite shot of the funnel cloud is shot on a tripod (i.e. not a moving camera…) but a move was added in "post’ (i.e. Pan and Scan – see below for an explanation.) Note that as you put these shots back to back in a montage – they can get a bit stale without a few of them having the camera in motion every once in awhile.
TimeScapes: Rapture from Tom Lowe @ Timescapes on Vimeo.
Speaking of amazing TL movies – I hope you’ve had a chance to see the film "Baraka." For those of you who are not familiar with the film – RUN don’t walk to get a Blu Ray copy of "Baraka." Or stream it to your favorite device (it’s worth getting the Blu Ray – trust me…) Ron Fricke pretty much gave birth to the art of the moving time lapse – or at least popularized it in what is one of my favorite films of all time.
TIPS:
The first thing I’d recommend you do – whether it’s live action (video) or Time Lapse – is to try out the Kessler Cineslider. You can use it manually at first to get some great video slider shots. Once you’re ready to motorize it – you’ll find an entirely new level of efficiency with your video shots and get buttery smooth moves consistently. You can use the Oracle controller to get perfectly smooth moves at the exact speed you’d like. And you can dampen (ease in or ease out) on each move so there is not jolt at the start or the end of the move. My friend PF Bentley agrees with me- "Once you motorize – you never go back" is his exact quote in fact.
As you do go motorized (There are 5 different types of motors the 500 series and the 200 series are the ones I find myself using the most) – you can not only shoot video of course – but you can start to do time lapse moves as well. And there starts the fun. You can buy a single motor for your Cineslider. And then use that same motor on the larger 4 foot / 8 foot / 12 foot etc ShuttlePod systems as you and your time lapse prowess grows. In fact you can add that motor to your Revolution Head when you want to get real fancy as well, and pan / tilt/ rotate on a move – and compete with the big boys in terms of the complexity of your shot. That being said – you should live by one of my favorite acronyms initially… K.I.S.S. (Keep It Simple Stup..) The more stuff you throw in there – the more points of failure you introduce into your potential TL Masterpiece.
A few important tips – use the most stable surface you can. Sometimes that can be a table or ledge… Either use 1 set of sticks in the center, a set of sticks + a monopod, 2 sticks on either end, or 3 sets of sticks in the left, middle, and right side of your slider. There is no such thing as TOO stable in this field. Sandbags and weight are your friend. As are safety cables if you’re in an elevated position (you can NEVER be too safe.) Wind and people your enemy. You’ll be fine with a single tripod with the Cineslider – but you’ll want to use more as you use the larger ShuttlePod system– this larger system allows you to do very long moves (the more 4 foot tracks you add together the further you can go obviously) and it also supports a fully decked out HDSLR camera package or Epic pacakge with Revolution head. Therefore you basically have an extremely complex TL rig and motion control rig once you invest in this system – for a fraction of what a similar system costs in the pro-video space.
One big tip: you’ll really want to invest in a "control module" and appropriate cable that allows the Oracle controller to fire your camera if you’re shooting long exposures. The idea is – you want to make sure you are firing your long exposure BEFORE or AFTER the slider moves (not DURING the move..) If you don’t have this – you need to do some serious math – and if you get it wrong, you might have the slider move during your 30 second astro-time lapse move…
Also – if you’re on a budget: You can also use a more basic controller that works well but doesn’t have all of the same bells and whistles the Oracle offers you. Keep in mind that you can add a fluid head to any of these rigs with the following part – one I highly recommend for live action shoots.
So start of slowly – one step at a time, let’s start with a basic TL move:
STEP 1: A SLIDE LEFT TO RIGHT
The most basic move is a left to right (or vice versa.) This looks like a standard dolly move. Keep in mind that the effectiveness of this type of shot relies on having a good foreground, middle ground, and background element to anchor your shot. If you’re sliding left to right and have nothing in the foreground – it’s difficult to appreciate the move. Shooting a 4 foot slider shot laterally with a long lens doesn’t tend to work well either – you tend to want to a little wider to exaggerate the motion in the foreground… but not too wide – as you may not be able to appreciate your background layer (as it becomes too small.) It’s a fine line to cross and a LOT of finesses goes into this. Initially trial and mostly error will help you learn the hard lessons we all have to go through to become good TL practitioners. TL is a game of patience and rolling the dice. The more complex the move – the more points of failure. And just because you have a JIB up on a slider base move, with a revolution head… doesn’t mean the shot will be any better than a locked off shot on a bean bag… you need to know WHEN an WHY to move the camera.
Keep in mind that as you move – you’re trying to take your audience on some type of journey. Are you sliding right WITH the stars (or rotating) so it looks like the earth is spinning and the sky is staying still? Are you moving with the clouds or against the clouds (more dramatatic) as they fly through your frame. All of these are important considerations. Oh yea… I almost forgot – don’t forget to make sure your batteries are fully charged before you start! You might want to check an external battery solution such as this Switronix Powerbase battery system that will power your camera for what feels like an eternity… I swear by them (especially in cold weather!)
After awhile, you’ll find that these moves can be a bit repetitive – and you’ll want to try out the next move…
STEP 2: PUSH IN OR OUT
The next step will be to PUSH IN (to move TOWARD your subject) or the reverse – to PULL OUT. This truly makes your feel like you’re flying through the landscape if done well (but not too fast! You want to try to entrance your audience…) I find that the most successful moves are ones the audience is not even aware of… they are just magically taken on a visual journey as the camera’s path in many ways follows the direction that they would naturally be turning their heads in if they were in the environment themselves… such as walking underneath and archway and looking up at the sky. The more logical your move – the better the outcome. Obviously and once again: of there’s nothing in the foreground – you won’t appreciate the move as much…
STEP 3: PUSH UP OR DOWN OR…
You can mount that slider in almost any orientation – as long as your motor can support the weight of your camera/lens setup. For your ShuttlePod you’ll want to put a second set of wheels onto it so it clamps on both sides of the rails – the possibilities are unlimited. All too often I assume someone is doing a complex JIB up TL move – only to find out it was a slider mounted vertically…nifty. If you don’t want to see the front of your slider on a PUSH or PULL – push in at a 45º angle…it’s a nice cheat…
STEP 4: Rotate / Pan / Tilt / Jib:
We’ll get into this in a coming post. There’s enough here for now to digest I think. A Revolution Head will allow you to go to the next level – as will a JIB. All of which can be motorized of course. We’ll also talk about one of the toughest part of TL photography – DATA MANAGEMENT!!!! If you’re shooting multiple cameras – you can expect to shoot hundreds of gigs of Canon 5D MKII CR2 files every day…. that’s a LOT of data to wrangle and manage. More to come…






Awesome article. It’s always good to hear timelapse advice from the pros.
Hey Vincent,
Loved part 1 & 2, and maybe I missed this, but once you import your files into Lightroom (in my case) you kind of lost me on how you get from importing to “and voila – you have video”. Is there some export feature that turns them into a video?
Vincent Laforet Reply:
June 30th, 2011 at 6:58 pm
Coming soon – I meant from QT 7 you just “save as’ a QT movie and you’re done. Easiest way to make a movie out of still files… (quicktime 7)
Thanks…nice overview of what can be a very daunting (but rewarding) type of shooting…looking forward to the motorized Jib section and how you wrangle the data without your head exploding…
Aperture Priority is inferior to Manual Mode for most timelapses. I only use Aperture Priority as a Last Resort, the Frame Blending required degrades the image too much for my taste.
You can fill up a 32Gb CF card in Six Hours if you shoot Large Raw. I did this shooting a waterfall, here – http://vimeo.com/20699946
Vincent Laforet Reply:
June 30th, 2011 at 8:22 pm
Good catch. “Inferior” is a big overstated and I clarified that I was talking about large exposure changes – I’ve had excellent luck w/ blending w/ GB deflicker. Saying you can fill up a 32 GB Card in six hours is incorrect. It all depends on how many frames you shoot per hour (and the total number of frames in the end) not the duration of the TL.
Very informative post and the tips in the video regarding the sliders and the slider movements is really a big plus. With regard to the above discussion on Aperture Priority vs Manual Mode – i totally feel its subjective to the situation. I have been trying to fildle around with both based on the end result i need and amount of work am ready to do in post to remove the flickring issue. Tom is def one hell of an inspiration when it comes to Timelapse photography 🙂
I thought the BTS video is over and its serious learning until the point i saw the last bit of it 🙂 You guys really have loads of fun both on and off the field aint it ?
Shiv
Side note….if you have a newer mac then Quicktime X is already installed and you won’t be able to install Quicktime 7 (from the link in Vincent’s Article). To have both installed….go to this link to download a slightly earlier version of QT7.
http://support.apple.com/kb/DL923
Aaron
Vincent Laforet Reply:
July 1st, 2011 at 10:26 am
Thanks for the correct link!
@Vincent Laforet, No prob. Great article btw…would love to assist for you on future shoots if you need another set of hands! I’m a true work horse!!!
Thanks for the tips Vincent — appreciate you sharing your experience.
Thanks for the info Vincent! Always great, great stuff and very inspiring. Looking forward to the After Effects workflow. Been struggling with compression and resolution concerns. Interested to hear how to work with RAW cr2 files.
Tony
Vince. Fantastic as always. You are always there to answer the tough questions that come up during production.
I would love to hear more about shooting astro time lapse sequences (e.g. frame rates, exposure, etc) and how you deal with shooting a day to night time lapse.
Looking forward to your AE workflow as well.
@ Vincent – thank you for a great TL tute (perfect to direct newbies to this page!) and nice to see you state “… you’ll learn to LOVE CLOUDS again” – so true! In my case I already spend time observing or being around/close to/inside clouds while paragliding, but TL results of their growth and decay is mesmerizing and brings back an appreciation of nature. I’ve found with cloud-specific TLs that if the formations are happening fast enough there’s not necessarily as much need for dolly work – depending on framing and foreground elements. Do you agree it can be a bit different compared to say your Mono Lake dolly TL work or Tom’s mind blowing star TL work? With clouds I’ve found nil or minimal pans/zooms in post work fine – and this is not written from a point of view of not owning a motorized dolly… yet :-). Interesting to hear of your experiences.
On flicker removal, this might sound like a lot of painful and eye straining work, but I haven’t always liked using GBDeflicker in VirtualDub (caused too many weird trails with cloud TLs), so I found altering the exposure manually on each RAW file in Canon Digital Photo Professional first ends up with phenomenally good de-flickered results. I used this time consuming method in many problem sequences for ‘Silver Lining’ (http://www.vimeo.com/18235468)
@ Rod Cole – for astro TL help, check out the very knowledgeable TL community at Tom’s Timescapes forum @ http://forum.timescapes.org/phpBB3/index.php
Vincent Laforet Reply:
July 5th, 2011 at 12:40 pm
Absolutely – the more movement you have in the frame – the less need for the camera to move… but when you do have both – it can be spectacular. What’s nice about GB Deflicker is that you can assign a region w/o clouds or two regions – may work.. you’re doing it the right way in DPP – but that’s a BEAR of a workflow… thanks for sharing the links!
@Vincent Laforet, BEAR of a workflow? Was thinking PIG actually… It wasn’t so bad – a lot of sequences were fine and fixed easily in that project with minor GB Deflicker application in VD, but some manually shot (not Aperture Priority) sequences had some often large exposure jumps between individual shots which GB Deflicker just wasn’t fixing so nice, so took the ‘bear’ DPP route. Some TLs required zero de-flickering at times too. On DPP, if you have it in ‘Thumbnail with information’ view, just keep your finger on the down key and you get a great view of what the TL will look like at speed and the histogram just right of the thumbnail shows any problem large exposure jumps easily when it moves left or right too much during fast scrolling.
Thanks for your feedback and tip Vincent.
It is a wonderful post
I have a question which is really in the context of shutter speed, but the principle is the same as Time Lapse… in a really, really bad situation (tons of light, no ND, requirement to get sharp image)- could shooting at 160 ISO but really high shutter speed- and then using Twixtor (or something similar) to smooth out out the motion, work?
Vincent Laforet Reply:
July 12th, 2011 at 12:44 am
It could – but it would be extremely time consuming… I’ve used Twixtor to slow things down – but not to add motion – I’m looking into Chronos from the Foundry to do that…
@Vincent Laforet,
Thanks for the confirmation and the link!
Looking forward to see how your experiments go to add motion in post 🙂
It’s not a scenario I’ve run into really… but it’s an interesting idea to think about…. thanks a bunch!
Hey Vincent,
Thanks for your expert insight. I think the best thing you can do when starting out is learn something new from each failure. Add each failure’s lesson to a big “never do this again” list. Eventually, these things will make up a check-list that will become second nature. From here you can concentrate on the perfect location, anticipating light changes etc. and not worry as much about the camera’s techincal settings.
You’re right about static time-lapse – it’s not as interesting. Here’s my time-lapse compilation I did over the last year around LA:
http://vimeo.com/26257790
The shots are technically sound but the static camera doesn’t do the landscapes justice. I think I’m finally ready for the next level and the next step is to add movement to the shot.
Fascinating article. I have been curious for quite a while now how this type of work was done. I’m definitely a fan.
Hi Vincent,
Thanks for those great posts about timelapses !
You talk about PUSH IN with the slider, but how do you prevent from having the slider in the frame ?
Thank you.
Vincent Laforet Reply:
August 15th, 2011 at 6:44 pm
Tilt up 😉
Great info.
WHat are the pitfalls , issues on location?
Do you need a permits? in city? at the parks like Mono lake? Theft? lookie loos who are more of antogonistic, etc?
Thank you
This is great stuff. Thanks for sharing. Thought you would appretiate this.. filmed on 7d at 60fps and 1 frame per 2 sec. enjoy. http://vimeo.com/27705442
mpo