Time Lapse Intro: Part I
I was commissioned to do a Time Lapse Tutorial series late last year that was just recently published by Canon and people really seem to be enjoying it so I thought I would share it on this blog as well. You can find the first video below and then go to Canon’s site for the remaining episodes. I also wanted to write about some of the gear that I’ve come to rely on to do all of my time lapse photography – notably motorized sliders by Kessler. So go ahead and check out the video below if you’re interested, and read on for a detailed list of gear and why I use it below that.
Canon Digital Learning Center – The Basics of Time Lapse Photography from Vincent Laforet on Vimeo.
This is going to be the first of a two part blog post – the next post will include more advanced features and moves, and include the pretty incredible CineDrive system. For now let’s discuss the basics of gear, and why I use it:
First – clearly you need a camera and lenses to get started, but I’ll cover that ins a separate article. Regardless of what gear you use below, the essential piece of gear you’ll need is at time lapse trigger and I’ve used the CanonTC-80N3 for years now without issue – it allows you to set an interval you want, and fires the camera ever "x" amount of seconds. You can also do intervals between shots, as well as put your camera in bulb mode and set longer exposures.
Tripods: Generally speaking you can use any tripod to do a time lapse. But since you want to avoid any sort of movement during the length of your time lapse, a sturdy tripod with some weight to it is your best friend. Having hook somewhere on there so that you can hang a sandbag (great ones here which are perfect for travel as you fill them when you arrive…) or even a contraption you make and fill with water, or even rice to add weight to your tripod is a great thing to look for.
Here are two tripods I use regularly:
The Manfrotto 055 CXPRO3 3 Section carbon fiber legs – which are fantastic because they go nearly flat, are incredibly sturdy, and also allow you to switch the center column from vertical, to horizontal – allowing you to shoot STRAIGHT down which is fantastic. Mine have literally travelled the circumference of the world a few dozen times over the years.
The heavier duty Manfrotto 057 series is the other set I travel with – these are rated to almost 40 pounds each unlike their little brothers. I basically travel on every single Time Lapse job with a set of both of these series (2X 055, 2X 057.) The 055 will work with the Stealth slider, and the 057 I use with the larger sliders and pan/tilt heads (or one single 057 at the center of a stealth slider for example.)
and the head I use most commonly as well:
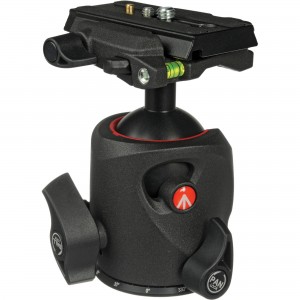 I’ve used Manfrotto heads (Such as the Manfrotto 055 Ball head) for more than a decade both to support still cameras of all types, as well as to support a dual camera plate, where I put an additional two heads on it, and two additional cameras. This allows me to very carefully fine tune my composition. When I use a dual camera plate, I can then have two cameras firing at once off of one Tripod, or on one slider, pan/tilt head, or Jib which allows me to do ones shot with a wide lens, and the other with a tighter lens for example. This is great when you don’t know how big of a factor the sky is going to be for example. If the clouds fade away, you’ve got your perfect tight shot. If the clouds turn into an unbelievable golden color, you’ve got both the tight version of your main subject – as well as the "safety" or wide shot with the expansive clouds – both shots that you can cut from one to the other rather easily in your final edit by the way..
You’ll notice that a fair amount of shots above are shot with a single tripod. Nothing fancy. Truth be told though, you need to have a lot happening in your frame to make an exciting time lapse if you’re not going to be moving the camera during the shot. That’s why I picked the busy Las Vegas strip for this tutorial, and the incredible depth of Bryce Canyon for the shoot as well… Always study you environment carefully and look for interesting patterns and movement when choosing you time lapse subject.
After awhile though – time lapses on sticks can get a bit banal.. to compete with others out there you’re going to have to start moving your camera during the time lapse. If you move left to right, towards or away from your subject, or in any direction throughout the time lapse, your audience will start to better "feel" the 3 dimensionality of the environment you are photographing. You can do this in post of course, but it doesn’t come close to doing for real, as foreground and background subjects don’t move IN RELATION to one another when you do it in post… all you’re doing in post is "zooming" into or "panning" or "tilting" the camera in post – but that’s not nearly as effective as doing it by moving your actual camera.
So the likeliest first tool you’ll want to get is a slider.
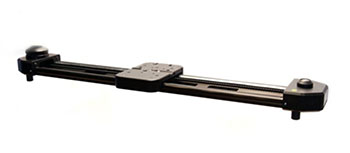 For those just starting out I’d recommend either a Kessler Stealth Slider (the widest one, unless you know you want to travel with it in a backpack..) This will allow you to attach a motor to it with a Basic Controller to do simple left to right, forward or backward (also referred to as a PUSH [In] , or PULL [Out], or "Z Axis" move. Or frankly almost any combination of diagonal or up/down move. Once you get going you’ll find that these tools bring your time lapses to life. Keep in mind that you can always use a motorized slider for live action as well – in other words you can use these during interviews when you are shooting video with the same motors and controllers.
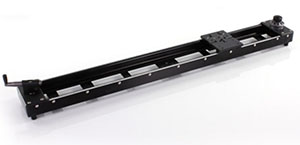 If you know you’re going to commit to this time lapse thing long term, I’d recommend you jump straight to the Kessler CineSlider as you can attach all of the more advanced heads Kessler (they are heavier, and this is a heavy duty unit) makes to it, down the line. The Standard and All Terrain Outrigger feet are a no brainer – you can find them and a ton of accessories on the CineSlider Page. These allow you to work from a very low profile on the ground. Alternatively you can of course attach either one tripod in the center of both sliders above, or if you have a heavier camera (which I always do) two tripods on either end of the slider (which I always do.)
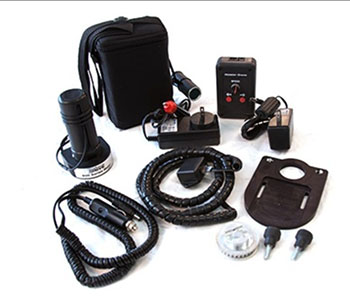 The next thing you will need of course is a controller, a battery, and motors. The Basic controller comes with all that you’ll need and is more than sufficient for most people starting out. It has a simple dial that when rotated clockwise moves the motor at a constant (extremely slow and can go all the way up to a nice quick slide for live action video – just plug and play.) I still use it on shoots with my Stealth Slider to date – when all I need is ONE camera body with ONE lens. The kit comes with a plate to mount the motor on either slider (Stealth or CineSlider) the motor, cables and all necessary accessories. Attaching a motor to either one of the Kessler sliders can be done in under 2 minutes and it’s extrermely straightforward. Kessler also has a pretty cool app for your iOS devices to do a bunch of quick calculations on speed etc here. The app also includes manual, video tutorials and generally a WEALTH of information. If you’re not an iOS person you can also go to their site here to use their Time Lapse Estimator.
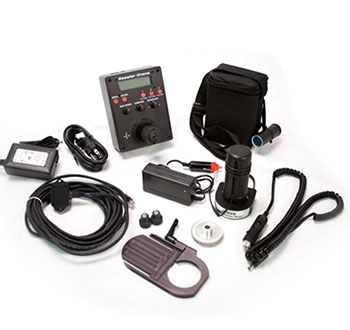 As with the sliders above – if you KNOW you’re going to do more complex moves, I recommend you make the jump to the Oracle Controller right away. It’s significantly more complex than the basic controller, and will also allow you to do even slower moves because it can be calibrated with your exact start and end point on the slider, and you can do some basic math to calculate the exact timing for your move. You will also need this controller if you ever go to a Revolution head – which is basically a pan/tilt head that easily bolts onto the CineSlider.
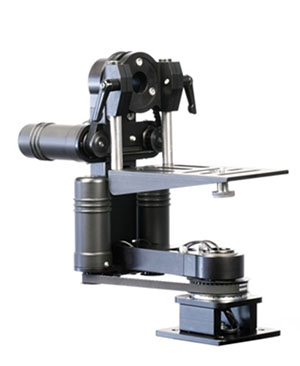
I’ve been using the standard Revolution Head for 2-3 years without a single problem. Yet the low profile one that has just been released it quite attractive if you can afford it. The higher the profile your head is, the higher it is off the ground which could affect certain shots. Not to mention that the low profile on is smaller and more compact, and therefore easier to travel with. The Revolution head has many uses. On a most basic level it can be used solo to do a simple pan or a tilt, or a combination of both – again both for time lapses over a long period of time, or for live action. I’ve used it extensively for both. This is a fantastic tool to mount at the head of any JIB that you may have – as you boom a jib up you can counter by tilting down to create a dynamic move for a live action shot as we did when the car made a turn into town at the end of Mobius. These tools will truly up the production value of your shoots as they are much more precise than mounting a fluid head to the end of a JIB. I regularly mount up to two cameras on this head and the CineSlider to shoot two different lenses (or different exposures) on the same move. For the purposes of this article though, the main focus is on Time Lapse.
There are two common moves when you combine a Revolution Head with a Slider. The most common is to slide right, and pan left – there are many terms for this but the one I prefer is a parallax move because if you keep your crosshairs on a subject in the center of your frame, if feels like the world is moving around them. (See the live action example of this at the 0:36 mark on the video below.) Tom Guillemette and Robert Zemeckis call this a Backpan move.
The other common move is a Z-Axis move or a push or a pull (towards away from your subject) combined with a tilt up or down. If well done if makes it feel like your camera is flying through a scene especially if you have a strong foreground subject. Watch the video below and notice this exact move when the camera moves through (PUSHES IN) the window of Grand Central Station at the (0:48 second mark), and TILTS UP at the same time. The preceding (0:46) shot is the exact same thing shot in reverse and with video i.e. live action with the exact same gear. This was accomplished with a Kessler CineSlider combined with two Oracle Controllers, one on the Revolution head, and the other on the slider for the Z-Axis move.
"How The World Advances" from Vincent Laforet on Vimeo.
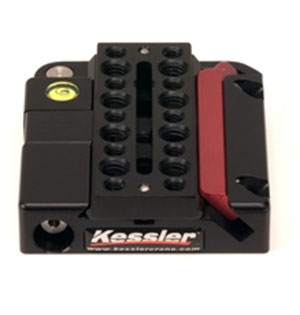 So that was definitely a lot more advanced than I wanted to go on this first post but that’s OK. Here are three other accessories that I would recommend you consider to make your life easier and your time lapse setup faster. I know that I bugged Eric Kessler to make the Kwik Release plate at the last TimesFest a year ago (and I wasn’t the first.) This simply allows you to mount a camera onto a ball head (see the LP Ball Head too) very quickly, or to attach a slider onto two sticks to the base of the sliders in a fraction of the time it would take to screw them in the traditional way.
 Ethics notice: Both Canon and Kessler are sponsors of this blog. I’ve used other cameras and slider units as well, but have always shot all of my time lapses with Kessler products and Canon cameras since the start. In short: everything I list in this article is the exact kit you’d find me with were you to run into me tomorrow on an actual job.


RT @vincentlaforet: Ok get your Time Lapse (Part I) FIX with HOW TO VIDEOS and detailed GEAR & Accessory list: http://t.co/2w9zlTVQuX
Time Lapse Intro: Part I – Vincent Laforet’s Blog http://t.co/eVYLR7C07S
I was commissioned to do a Time Lapse Tutorial series late last year that was just recently published by Canon and… http://t.co/JaLXmOvXwy
Time Lapse Intro: Part I http://t.co/GzNuwyfxyq
#صباح_الخير
تعلم الtime lapse مع الفنان فينست لافريت
http://t.co/gLfTkoZrPK
#kuwait #الكويت #q8 #السعودية #film #فلم #dslr #سينما #cinema
Terrific, thank you very much! Have been waiting for something like this, although there is a lot of info out there, but you rock. It’s actually quite a big investment for someone outside the US as it seems the ratio of cost and how much money we make is different. =P
Vincent Laforet Reply:
April 28th, 2013 at 11:26 pm
It’s all always relative yes… but compared to previously available systems there is absolutely no argument that would counter the fact that this system is SIGNIFICANTLY more affordable.
Time Lapse Intro: Part I http://t.co/K3MtLHmExF via @sharethis
Hi, Vincent! Great video =)
What camera was the actual tutorial shot on?
Thanks!
Vincent Laforet Reply:
April 28th, 2013 at 11:25 pm
C300 – all of the time lapse shots were done w/ the 5D MKIII and a very few w/ the 6D.
The Basics of Time Lapse Photography with @VincentLaforet http://t.co/N7LynOlIqG http://t.co/wwZSdsp2Xn Un cours magistral de 20 min !
“@vincentlaforet:I put together a video & post w most of my #timelapse tricks, tips, & gear http://t.co/fwYiNzd5Au” @realandyhoward
RT @vincentlaforet: Lazy Sunday morning? I put together a video & post w most of my #timelapse tricks, tips, & gear http://t.co/2w…
Lazy Sunday morning? I put together a video & post w most of my #timelapse tricks, tips, & gear http://t.co/6YN6yyeoCa (via @vincentlaforet)
Finally a video which explains time-lapse in a clear way. I’m looking forward to the next part!
Marc Voogt
Experiencing with time-lapse, 1 complete video so far.
( http://www.youtube.com/watch?v=htm6mZrm30g )
One thing I’d like to see is exporting software, I shoot in maximum resolution on the Canon EOS 550D, but when I export it with the LR time-lapse plug-in for Adobe Lightroom 4 then it looks a bit like a 240p movie :/ Such a waste of pixels.
Vincent Laforet Reply:
April 28th, 2013 at 11:24 pm
not sure what you mean about 240p … You should have ZERO loss when using Lightroom… definitely not in terms of quality or resolution.
Marc Voogt Reply:
April 29th, 2013 at 9:41 am
@Vincent Laforet, I meant the pixellation, dark clouds appear as squared grey blocks. The raw pictures show sharp dark clouds, also after editing, but after exporting they appear as grey blocks. I guess it’s a rendering bug.
What software do you use?
Thanks for replying!
Vincent Laforet Reply:
April 29th, 2013 at 9:11 pm
I think your compression settings are way too high – that would lead to blocky (compressed) artifact output
Marc Voogt Reply:
May 1st, 2013 at 1:47 pm
@Vincent Laforet, thanks!
http://t.co/D6WLwB6UNh
Time Lapse Intro: Part I http://t.co/sHgiXs1gbN via @zite
! RT @vincentlaforet: Lazy Sunday morning? I put together a video & post w most of my #timelapse tricks, tips, & gear http://t.co/C766EOviYq
Tutorial Time Lapse. http://t.co/cqZ5iyNtwR)
Hi Vincent,
Thank you for posting this series, I am enjoying it very much and utilizing your suggestions. Could you please elaborate on the “mirror lockup” suggestion you pose in episode two, at approximately the 6:05 mark? I’ve tried this with my 5D Mark ii, however unsuccessfully due to what I can determine is the intervalometer (Satachi) holding the mirror up on the first fire, then taking the photo on the second fire. Clearly not ideal. Any advice or suggestions on what I may be doing wrong?
Thank you so much!
Vincent Laforet Reply:
April 28th, 2013 at 11:23 pm
The problem is that it only seems to work for the first exposure w/ most Canon cameras which is a shame… It should be a repeatable function (Canon are you listening? 😉
Hi Vincent,
Have you had a chance to use the Genie Timelapse device, and if you have, would you recommend it?
http://syrp.co.nz/
Vincent Laforet Reply:
April 28th, 2013 at 11:22 pm
Haven’t no – checking into it.
claude etienne Reply:
April 29th, 2013 at 1:20 pm
@Vincent Laforet, Great. I hope you’ll share your thoughts on it.
The Basics of Time Lapse Photography by @vincentlaforet http://t.co/dhFoQSKHSi @CanonUSAimaging
Nice tuto. Thanks for sharing !
RT @DPhotoCafe: From Vincent Laforet Time Lapse Intro: Part I http://t.co/3vcNjUR00a #photography
Vincient, thank you for your thorough and detailed look at the basics of timelapse. Quite helpful. One question I had was how much grading or post production editing do you do to create you final timelapse sequenses? I am curious if you spend alot of time fine tuning in photoshop or LR before batch processing the images.
Vincent Laforet Reply:
April 29th, 2013 at 9:10 pm
I can spend a lot of time for commercial gigs yes – for this one though it’s close to raw- just a little added sat w blacks and whites
Guia per capítols sobre com fer un timelapse http://t.co/pggRXyrBJR by @vincentlaforet
RT @thinkTANKphoto: A great step into time lapse photography by Vincent Laforet a Canon Explorer of light… (& packer of thinkTank… …
Time lapse for beginners.. by the master #vincentlaforet #canon #5D3 #timelapse http://t.co/LKooZ2EEmx
Time Lapse Intro: Part I http://t.co/sOvO6gQ60n #filmmaking
Time Lapse Intro: Part I Vincent Laforet’s Blog #photography http://t.co/btddgLbDHR
Time Lapse Intro: Part I – http://t.co/xmEPfOkVnI
Vincent Laforet: Time Lapse Intro – Part 1 http://t.co/ksMBsB786a
Vincent Laforet video offers helpful guide on time lapse photography
http://t.co/Y1FTbPrmyk
So you wanna do time lapses?? here’s what you’ll need… http://t.co/G6m3kxzmDU
RT @BHPhotoVideo: Intro to Time Lapse Photography with @VincentLaforet: Part 1 http://t.co/U7srjc4WQ7
@BHPhotoVideo: intro to Time Lapse Photography with @VincentLaforet: Part 1 http://t.co/ETdvucDL1X
Watching videos admiration. thenk u
Vince, huge fan of your site and work…
It seems a little odd to look at the math of a time lapse solely by how long you want the final piece to be. Maybe I missed it, but was there discussion on the speed of the subject? If I’m doing a time lapse of construction (which I am right now), I’m not going to shoot a frame every second. If I’m in a plane close to the ground, I might shoot a frame a second, but when I get up in the air slow it down to every 5 or 10 seconds. This seems to me to be the most important factor in Time Lapse.
Vincent Laforet Reply:
May 12th, 2013 at 11:31 pm
the formula is there ONLY to make sure people know they’re getting the minimum amount of frames they need… there is NO need to shoot every second for most time lapses… every 4-8 seconds seems to be a good sweet spot for most of my TL – best – v
Thank you for the awesome time lapse videos. I’ve had a chance to watch all four of them now. When initially learning time lapse using Canon gear I ran into some issues with flickering, especially in the corners of my finished movie sequence when I used a very narrow aperture. I read a lot of blogs who said this had to do with how Canon EF lenses work that the aperture opens and closes with every shot and the flickering is the residual aperture movement being captured in the shot. I didn’t know if this was true but I tried their fix and it worked. The suggested fix is to dial in all your settings, focus, etc… for your shot and then depress the DOF button to set your aperture. And while still holding the DOF down press the lens release button to disconnect and rotate the lens off of the electronic contacts. This causes the aperture to lock into place. It worked and the flicker was gone! But… I didn’t like this method as I now no longer have a secure lens and my focus can be off. Have you had/noticed this problem and how have you overcome it? I could be way off on all of this I would appreciate any advice you have. Thank you again!
Vincent Laforet Reply:
May 12th, 2013 at 11:30 pm
Great tip – knew about it but can’t mention on an official Canon website 😉
If I film a timelapse of a kitchen with chefs and staff running around, should I set the camera focus to “one shot” or “ai servo”?
Vincent Laforet Reply:
May 12th, 2013 at 11:29 pm
Neither – you should not do AF on a time lapse unless you want some pretty unpredictable results. Switch you lens to manual focus and tape down the focus ring so that it does not get accidentally bumped.
Vincent,
Is there a specific riser you would recommend to raise the DSLR body to fit in the O’Connor Obox properly?
Vincent Laforet Reply:
May 27th, 2013 at 3:50 pm
I use a Redrock DSLR Cage or their connector that goes on a hotshoe w/ rods to us w/ OBox…
I’m dying to motorize my konova. Love these shots. Vincent you’re my hero.
where is the part 2, or more?
Vincent Laforet Reply:
July 8th, 2013 at 12:30 am
There are 4 parts to this video on Canon’s site. We haven’t done a 2nd or 3rd part of the overall class yet…
Bonjour si vous aimez partager svp
filmé avec une go pro 3
http://www.youtube.com/watch?v=HDeBS4Iiv4Q
timelapse photography is a complex subject to be forayed into.
Excellent, excellent work! The way you explain things are quite easy to understand so I’m getting confident on trying timelapses. Can you tell how much time is the minimum of your final video? I’ll explain.. Imagine that you want to put a whole day (sunset – night – sunrise – sunset) into your timelapse. It is not possible to put only in a 10s final video right? Is there a minimum quantity of frames or so?
Hope you understand my question. Thank you very much!
Vincent Laforet Reply:
January 4th, 2014 at 11:27 pm
You need to calculate how long your final piece needs to be and at what frame rate… if you need a 10 second piece at 24 frames per second… you need to shoot a MINIMUM of 240 frames… so if you shoot an event that lasts 24 hours, you need to shoot at least 10 frames every hour (I recommend much more!) or one frame every 6 minutes.
Great info on time lapse camera systems