MotoArt
A few months ago I decided to shoot a piece about an extremely talented group of artists that work just a few blocks from my office. One of the key goals for me was to go back to the basics – keeping things as simple as possible. No Steadicams, fancy helicopters, or generators for lighting: just simple and straightforward. I wanted to shoot in a style very similar to the way I used to shoot as a still photographer: one camera, one prime lens at a time, one small light – handheld.
I think it’s very important to exercise these type of "simple" ways of working on a regular basis. While technocranes, jibs and dollies can do amazing moves, you’ll often find that you don’t always need those complex moves to tell a story. Sometimes using your body to slide left to right is the way to go – even if you don’t hit the move on the first go. I find that I can actually save a tremendous amount of time by doing a small move by hand 3-6 times with most of them being "bumpy" or technical "failures" – and nailing just one out of 6. Doing this allows me to be much more fluid and reactive as well to what happens in front of me. It’s physically much more demanding (and will lead you to discover muscles you never knew you on the following day,) but it often leads to great results with much greater variety than you get when you set up complex shots with complex equipment. This is a lesson that took me awhile to learn as a filmmaker – but I think a key one that would benefit almost anyone out there. Take a look at the video above – it was shot over three days – each time I would spend 60-90 minutes max on location – in other words we shot very little and didn’t treat these as full day "commercial" shoots. Below you’ll find a list of the gear I chose and why, as well as a behind the scenes look on the shoot at the bottom of this post.
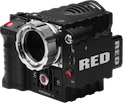 RED EPIC – M The RED Epic is one, if not my, favorite cinema camera these days. I love using the Alexa, the Phantom cameras, or of course the C300 or 5D MKIII. But the first two cameras don’t allow me to shoot handheld and solo – due to their weight and size (alhough I can’t wait to try out the Phantom Miro!) The Epic gives me an incredibly sharp image, that can be tweeked in post (due to the raw recording format) and graded beautifully. The fact that I can shoot up to 400 fps is a HUGE factor for me as well – not to mention that I can use both PL , Canon EF, Leica M and Nikon lenses by quickly switching mounts on set. This spot was shot between 72 fps and 300 fps (for the sparks.) I find that the fact that this was shot in natural light under fluorescent lighthing, handheld, at 300 fps is amazing – especially when you see the quality of the imagery. This camera will continue to be my go to camera for this type of shooting for the foreseeable future. Another thing to keep in mind – if you’re shooting handheld without sliders/JIBS etc – shooting at a faster frame rate will allow you to effectively hide your "bumps" better in your movement given that the footage plays back much more slowly – a nice trick. Shooting in 5K will also allow you to stabilitze quite a few shots in post using Adobe CS6’s Warp Stabilizer tool that is available in both Premiere and After Effects. Warp Stabilizer can do wonders when you don’t see too much paralax in your shots – it can make a handheld shot look like it was shot on a tripod (and locked off) and make a handheld slide look like it was shot on a slider. Warp won’t fix everything – but it can definitely do some pretty impressive magic when you know how to use it – and what if can’t fix when you’re shooting… two quick tips: 1. Make sure you keep in mind the flickering of HDMI or fluorescent light when you shoot at high speeds – you’ll need to select frame rates that don’t cause the image to flicker when played back in real time (you may not see the flicker when you are recording live – so be careful and make sure to playback each time you shoot a clip.) 2. It is VERY important to put a piece of glass between the sparks and your lens when you shoot them flying at your lens… they are extremely hot and CAN damage your lens and even the glass of the front element if you get too close.
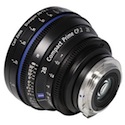 Zeiss CP.2 Lenses These too have become my favorite general purpose lenses. I also think they are the PERFECT investment for new cinema shooters for a few reasons. First the quality of the glass holds up to almost anything out there – you will continue to use these lenses long term. These lenses outperform all of my still lenses, notably in terms of sharpness and notably when wide open. You will of course find that there are Arri/Zeiss Master Primes and Cooke and Leica cinema lenses out there – but those will hurt your wallet quite a bit more than these will. This video should clearly show you how razor sharp these lenses are. The CP.2 series is also a set that will grow with you as they come with both Canon EF and PL mounts that you can switch out in the field. Therefore you can start with your Canon 5D MKIII or other with the EF mounts, and use these for the rest of your career on PL cinema cameras. The size and weight of these lenses is also a huge factor – I’ve found DPs I work with have gone to using these lenses at times over their more expensive Cookes/ Master Primes due to the small size and weight relatives to the Cookes/MPs. You can of course also pull focus exponentially more easily with these lenses (and their detailed distance marking) than you can with EF lenses and Zeiss ZE lenses. Therefore if you are looking to make a long term lens investment but don’t have the mega budget the Cookes/Arri/Leica lenses command – this is the way to go. I would even recommend you overextend yourself a bit and buy the CP series over the Zeiss ZE lenses if you can at all afford to do so.

O Box – This has come to be my favorite Matte Box for several reasons. It can snap on, or be rod mounted. It can also be rod mounted from both top and bottom actually which is especially useful for DSLRS and Epic packages that are small… having top and bottom rods will allow you to fit many more gadgets than you would on a single rail set which is a significant factor. I also love the fact that you can use grips (see below) directly on this matte box and operate. You often find yourself trying to find the space for handle sets on the rods on these tight camera packages – and will also find that the handles are too close to your body. This allows you to put the handles at the end of your camera. This O’Box also has 1/4-20 mounts all over the edges and allows you to mount a bunch of accessories. In my case I routinely mount my LCD or RED LCD on the top lip of the O-Box with a quick release Cine-Lock (below.) That gives me plenty of room for a top handle and EVF on my Epic body – and the EVF up front.
 O Grips – These have always been a well hidden secret. They’re my favorite handles/grips for handheld as they actually lock dead tight and do so quickly. You can articulate them easily and also use them as a poor man’s tripod or high hat by adjusting these handles to point your camera while low on the ground. I also use these as top handles.


 MPRO 536 Tripod – I’ve used these sticks for years now – and they are perfect for silders. Add a quick release plate to them (such as the Kessler Kwik release pictured above) and you can built and take apart your sliders even more easily and by yourself. Those quick release plates sure beat having to rotate these tripods into the base of your sliders which can be a pain to do by yourself or out in the field – especially when you’re in a rush.
 Kessler Pocket Jib – This is the perfect travel jib for me – and one that I can build and operate by myself. Although we didn’t use it much on this shoot given my desire to shoot mostly handheld – it contributed a wonderful shot from the bottom of the wing revealing the posters above 2/3rds of the way through the video.


Thanks for the description of your work it’s very helpfull !!!
Very nice indeed. Interesting and very good to see that it is not always about “the gear”.
Keep up the production 🙂
Great job, would like to see more about this kind of project.
Thanks for sharing
That first video was very engaging. Nicely done Vincent!!!
Also, thank you Jim Jannard for the Red system.
Great imagery, as always. Though I would hesitate to call this “back to basics ” considering the gear you used. A camera, 1 lens and monopod would’ve been more like it 😉
I really like the organic, stripped down approach — a great piece.
Thanks for sharing.
S.
I wish the behind the scene was longer. I love to see the way you work, how everything gets done!
Very nice work and thanks for the article and tips.
Xavier.
Very good clip. Thanks for sharing this details.
I read the opening paragraph, and watched the video and at that point i was really impressed. Then I saw the gear you used(!) There’s nothing basic about a Red Epic!
Vincent Laforet Reply:
August 9th, 2012 at 10:37 pm
We’re talking everything else…
I kind of agree with “seenematic”. This may be considered the bear essentials compared to what you typically use, but this gear list is much longer than I anticipated from the “back to basics” description. And some of it is also VERY expensive.
However, it’s a pretty sweet video.
Vincent Laforet Reply:
August 9th, 2012 at 10:36 pm
Point is – you can do similar w/ one lens and light – yes I used a great (expensive camera) and lenses – but they aren’t essential… and this is sadly a lot smaller kit than what I typically use… it’s definitely “relative” – v
Great little documentary, and the subject also speaks to me, being somewhat of an aviation geek 🙂 Thanks also for sharing the extensive info and beautiful BTS video.
I was wondering how you handle working with the editor for this type of project. Are you completely hands-off when it comes to editing, or does the editor work from some kind of storyboard, to make sure the edit stays in line with your vision?
Vincent Laforet Reply:
August 15th, 2012 at 4:13 pm
The editor does a rough cut and then we work together closely from there to refine the edit, to put shots in he may have missed etc.
thanks you for sharing the bts.
It’s very motivating
Sweet video Vince! A wouldn’t exactly call using a slider, a tripod, and a crane handheld though haha. We get the idea though!
@Vincent Laforet, – Good point. Even though this particular setup is still beyond my reach, there are clearly cheaper alternatives that can be used that would get the job done just fine. Especially for a project like this.
Thanks for sharing. I love seeing what cool things people can manage to do without much gear since it’s a real-world scenario for someone like me.
Nice short and interesting shooting kit.
I wonder why you say the ALEXA, which costs the same as the EPIC (in the EU at least), can’t be used handheld for shoots like this. While it’s not as light as the RED, rigged with an Ultra Prime, Batt, EVF, FF and MB (no need for shoulder rig), the package is around 9kg, which is what the traditional ENG Betacams did.
On the other hand I’m looking for and additional cheaper and smaller rig than this ALEXA for run&gun -with CP.2s rather than UltraPrimes- that does 50Mb 422 and 1-60fps, but none exists yet. The C300 doesn’t do 60fps and looks like video, while the F3+slog requires a very expensive recorder for 60fps…
Thanks for the informative blog post. I’d like to ask though, besides the cinema housing, would you think that the ZFs are a better purchase for the more budget conscious shooter than the CP2s?
The problem I have with the CP2s is that they use the same elements as the ZFs, but I’m paying more for the housing. I love the greater range of focal rotation for the CP2s, the 14 bladed iris, and the interchangeable mounts, etc, but besides those huge perks I could purchase a set of—arguably similar—ZFs for the price of one CP2.
So as a cinematographer slowly building his kit, should I purchase a set of CP2s piecemeal or get a set of ZFs?
Cheers!
p.s. The issue I have with the ZEs except that they use an electronic iris, so this is why I’m not considering them for a purchase.
I love the black and white grade of this. The tones are so rich. What is the secret and could something similar be achieved with a much lower level camera such as a Canon T3i?
I know the images wouldn’t be exact and that is why a Red Epic is more expensive. I would just love to get into the ballpark.
My NLE is Final Cut Pro X.
Vincent Laforet Reply:
October 18th, 2012 at 9:32 pm
There’s going to be a significant difference… it’s RAW vs compressed codecs. Like comparing a JPEG to a RAW file.