Traveling with the RED Epic

I have spent a good portion of this year on the road, from Australia to Southeast Asia and back – and I made the point of taking my RED across the globe. What’s the point of owning such a camera if it lives on the shelves back at the office after all?
The challenge has been: how do you carry a digital cinema camera with you across the world, have the essentials you need to shoot, without lugging a number cases of gear with you everywhere?
As I have said from the beginning, my favorite thing about the RED EPIC is how compact and portable it is. It’s the closest (at 5K capable of 120 fps producing RAW files) that you can currently get to traveling with an IMAX camera today…
The beauty is that you can carry this camera in a backpack or roller case with you literally anywhere, along with all the accessories you need to shoot – which can’t be said of most high end cinema cameras – they’re simply too big and far too heavy.
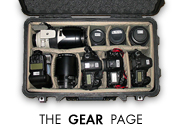
 Lately, I have been using the Petrol DigiSuite DSLR Camera Case (pictured left) to house my EPIC and accessories. This is a carry-on size roller case (much like the ThinkTank rollers I have used for over a decade for still cameras) but this bag’s notable difference is the heavier-duty customizable velcro padded inserts so you can customize the internal layout and the fact that it was designed specifically for DSLRs/Cine cameras and accessories such as matte boxes.
The interior has a length of 19.7 inches, width of 13.2 inches, and height of 8.27 inches. While this bag is meant to fit in US Overhead bins on airlines – it is also built to protect your investment and keep your gear (that one normally packs in cases) safe.
When taking the EPIC out with me, I typically always have the Canon EF mount attached to the camera. This allows me to use both Canon EF glass, and my Zeiss CP.2 lenses. Usually, I travel with the 25mm and 50mm CP.2 lenses – my two go to lenses in general for cinema. I’ve also been going around with two stabilized lenses, the new 24mm f/2.8 IS and 100mm Macro f/2.8 II. These IS lenses are great for handheld work – the 100mm macro especially, I can often do handheld shots that look like they were shot on sticks. If I do find myself wanting to rent PL glass for some reason, I bring the PL mount for my Epic just in case I get asked to shoot a job while on the road.
Depending on how I accessorize the camera, I also bring along two solutions for filtration. In run and gun situations, I like avoid having to deal with rectangular filters and matte boxes, so I use a Schneider Vari-ND 77mm filter for the Canon glass with step up and step down rings.
For the CP.2s I use 114mm circular filters from Schneider and affix them to the lens using an adapter that was originally designed for using circular filters with Angenieux glass (They’re still working on a prototype so I’ll let you know more when it’s available as a product you can buy. Basically this allows me to snap the high quality Schneider ND filters directly onto the front of my CP.2 lenses) If I do want to build out the full kit with the matte box, I use Schneider 4×5.65 ND Filters – though I won’t always travel with a full set, maybe just a 0.6 and 1.2, and a circular polarizer.
In terms of accessories, I try and bring enough parts so that I can either shoot quickly on the fly or be prepared for a more typical studio setup. I always have the DSMC top mount attached to my EPIC body, and typically I have the DSMC plate attached to the bottom (which has a RED quick release mount and 15mm lightweight rod adapter for the front of the camera). So when I need to shoot with the camera quickly I will throw the sliding top handle on the top mount. If I want to build out a full shoulder mount I can attach the DSMC shoulder pad with the quick release platform easily to the bottom of the camera. I can then throw on lightweight rails and mount my Arri FF-1 follow focus and OConnor O-Box. The hand grips that I use are OConnor O-Grips, which I can attach directly to the side of the matte box.
For monitoring I travel with both the 5" RED LCD and the Bomb EVF. I can attach the LCD to the camera body using 16×9 Cine locks, and mount the EVF to the top rail mount using the Spinner mount. Which of these I use is totally dependent no the situation, but it is convenient to have both options.
For power, I travel with 6 RED Volts and the RED volt charger. These batteries work great for run and gun shooting – adding very little extra weight to the camera. They don’t have a large battery life, but are completely adequate for trying to grab some beautiful imagery on the fly. In the event that I need to use the camera on a more traditional shoot – I always pack my gold mount battery plate so that I can rent some Anton Bauers for extended camera battery life.
The one thing that is very important to note about packing my EPIC in a carry on is that I am always pushing my luck just quite a bit in terms of weight restrictions. I’m playing with fire really. The kit weighs in exccess of 30+ lbs. when it is fully loaded, and around 25 lbs. w/ minimal accessories. Airlines definitely frown upon these weights as the maximum allowed overhead compartment weight is 20 lbs. in U.S. airlines – and less so in international airlines. I often try to sweet talk the airline personnel into stowing this in the front compartment which is doable when I get upgraded to business class – but nearly impossible in economy. So keep this in mind as it’s also frankly dangerous. However, if you are only fitting out your Petrol roller with a DSLR camera kit, weight should be far less of an issue for you.
Below is a visual breakdown of how I pack the roller to fit my EPIC, EF lenses and accessories, in three stages. Over the coming weeks I will go over some other solutions that I have been using – including smaller backpacks, as well as checked luggage cases to make this work.


Vince,
I have RED Bricks (and the RED Volts but they are not that useful as I only have 4) I get different answers about if I can take them on a Plane or not. I am assuming you rent the ABs so as not to deal with this restriction.
Vincent Laforet Reply:
October 30th, 2012 at 2:46 pm
Yep – Lithium ion can definitely be an issue. – I end up renting locally
All of your links for the Petrol bag are for the non-roller version.
Thanks Vincent. We run F-Stop bags for our RED in the field. But I have been anxious to find a non-pelican option for more traditional travel. This is a huge help (and those bags are reasonably priced).
Hi Vincent. Fantastic article. Just in time since me and my wife is heading over to Costa Rica with our new Epic.
I’m wondering if you have any advice regarding backpacks. To have wheels on the bag sounds perfect for traveling in the city but we also need to carry our Epic and probably Red Pro Primes into the forest. Any advice would be great 🙂
Vincent Laforet Reply:
November 5th, 2012 at 9:19 am
Petrol also makes a very nice backpack similar for this – http://www.bhphotovideo.com/c/product/686489-REG/Petrol_PC301_PC301_Deca_Campack.html/BI/6768/KBID/7344
Another option would be the Panavision´s bag:
http://www.elysiavisuals.com/content/panavision-bag-stage-one-slider
Vincent Laforet Reply:
November 5th, 2012 at 9:12 am
While this seems to be an awesome bag to work from on set – it doesn’t seem to have the padding the Petrol bag does, not to mention the lack of wheels… when you lug 25-40 lbs…wheels are NICE 😉
@Greg Clark,
http://www.idxtek.com/lithium-ion-transportation is a good reference. You should always clarify things with your airliner if you are unsure, traveling internationally, or traveling on smaller or private planes.
If you need more battery power and you cannot rent, then you may have to ship batteries as class 9 hazardous materials. Through my experience with friends at Panavision, this usually means packing them in Pelican cases, with only so many watt/hours per case.
How do you deal with customs? Carnet or do you deal with it on a country by country basis?
Vincent Laforet Reply:
November 7th, 2012 at 10:59 pm
Both – Carnet when I have cases. When it’s a backpack / roller (only) I chance it… Really depends on the country. Certain countries are extremely strict… so I recommend you do proper research and whenever in doubt go w/ a Carnet. Especially if you have more than ONE bag w/ gear in it.
Completely newb question, so apologies beforehand. I have some attachable Camera handles similar to your RED camera handle that you attach. Have you ever had any problems bringing camera handles with you on your carry on? Thanks
Vincent Laforet Reply:
November 7th, 2012 at 8:34 am
No never any issues
Have you considered the PAG as a battery option?
Ive been reading up on them.
Seems to pass all restrictions.
Great article Vincent 🙂
Vincent Laforet Reply:
November 12th, 2012 at 3:40 pm
No – please send a link – not sure what a PAG is to be honest!
Vincent, I think he means PAGLink. I’m planning on purchasing a few myself. Here is an overview:
https://www.paguk.com/landing/PAGlink
The benefits that I can see are:
– you can have several at once at the camera
– they display the time left on each battery
– they have lots of extensions for usb, phone power etc
– you can recharge many (up to 8) at the same time.
Best
Vincent Laforet Reply:
November 16th, 2012 at 12:28 am
Cool! thanks for the link!
Vincent,
We too plan on traveling quite a lot when we recieve our Epic. Have you ever tried the Red Primes? I notice you use the CP2 and canon lenses. They are MUCH lighter to carry but of course not as light sensitive as the Red Primes. Do you think it would be worth lugging around a few Red Primes compared to CP2 lenses to get extra speed and sharpness? We are 2 which of course means we can carry a decent amount but the weight is sure adding up 😀 Thanks
Vincent Laforet Reply:
November 16th, 2012 at 12:28 am
I’ve used the Red Primes sure – they work very nicely. I just prefer the Zeiss to be honest – especially the new super speeds. The new Canon primes are pretty stellar too…
Do you ever find that you need to use Hot Mirror or IR filters with the Epic? Specifically for outdoors shooting? I saw that you pack some ND filters with you, and was curious what your experience was with IR pollution and the Epic.
Thanks!
Wes
Vincent Laforet Reply:
November 28th, 2012 at 12:25 am
Only when I go above 4 stops of ND. Best – v
Hi Vincent,
Thank you for passing on your years of experience, it is as always much appreciated.
I’m torn between the Petrol Digicase that you mention above vs the ThinkTank Airport International 2.0
I sadly don’t have a Samys or a B&H to compare where I am. Could you possible help push me towards a decision?
I already have a ThinkTank Airport Security but need something a bit smaller for international flights for Scarlet / Dslr set ups.
Have you taken this Petrol Case to Europe and flown between European countries with any problems?
Thanks,
Phil
Vincent Laforet Reply:
December 19th, 2012 at 5:05 pm
I have taken the petrol case to Asia / Australia and had no issues. For any of the European airlines I would go w the airport international form think tank or the carry on pelican case in case you ate forced to check it due to weight restrictions.
@Vincent Laforet,
Thanks for your reply! 🙂
I think I’ll go with the ThinkTank.
Cheers,
Phil
Hiya Vincent!
I’m still hunting backpacks. Have you tried the Petrol 332? It’s a bit big for airplines but maybe they would accept is.
Another backpack I found is the Kata 610.
http://www.kata-bags.com/pro-v-610-pl-hdv-backpack
It’s high and has a lot of volume in it. I’m concerned that the inside is too soft so I wont be able to pack heavy lenses in it though. Always liked the Kata bags, but they are not so secure on the inside.
How much trouble have you had with seize of the bags on airplanes? You mentioned weight but myself I’m mostly concerned about the bags simply being too big.
Best wishes and thanks for an extremely inspirational and useful blog!
Andreas and Natalie
Vincent Laforet Reply:
March 30th, 2013 at 1:29 pm
It’s always a challenge and I own 7 different types of rollers/backpacks… each for a specific camera / airplane size…
Vincent, did you have any problems with airport security while travelling with this camera?
Vincent Laforet Reply:
April 6th, 2013 at 3:46 pm
Nope.
Hi Vincent, Do you ever travel with a carnet or the receipts for customs purposes?
Vincent Laforet Reply:
January 3rd, 2015 at 8:13 pm
Carnet all the time
Ignore my last question. I see it was already asked. Sorry.