Here is a behind the scenes look into our "Epic #308" we shot a little over a week ago that premiered on this blog.
This piece will serve as a quick overview of some of the gear we used. You can expect a more detailed piece early next week on how we use our time lapse equipment and a few more "tips and tricks" for still camera time lapses, one that includes a pair of Canon 5D MKIIs (shooting parallel to one another on an 8-foot track, each body with a different lens.)
We have also gone ahead and put up an entire new section of time lapse gear for you on the popular gear section – and that’s live now.
Here is a first glimpse into our journey behind the scenes. We’ve had a lot of demand for this type of material and I hope you enjoy it. Shooting any primary piece is a lot of work as you all know – but trying to simultaneously shoot a behind the scenes piece is a whole other story. And then comes the edit! 😉
Redwoods – Behind The Scenes from Vincent Laforet on Vimeo.
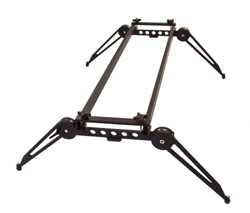
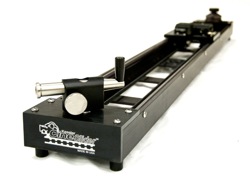
As you’ll see we used a variety of gear – notably Kessler Crane’s Shuttle Pod System with their Electra motors and Oracle Controllers. This allows us to motorize the cameras on the dolly track – both for time lapse photography (with HDSLRs still cameras and/or the Epic) as well as to shoot live action (video – i.e. motion control.) It’s important to note that you can do this at an incredibly reasonable price relative to other systems out there – especially high end systems that quickly go into the $30K all the way up to the stratosphere for high end systems.
Next week I’ll go into a bit more detail about each piece of gear and what I recommend you use for each situation – and I’ll pay attention to your budgets and needs.
We’ve also made a lot of use of the revolution head that allows you to pan, tilt and rotate and take time lapse to the next level – not to mention combining the head with cranes! (Then you can REALLY show of to your time lapse friends 😉 Just kidding…kinda.)
You should note that we used both the Cineslider and the 4 foot track sections with and without motors for live video and got incredibly good results with our fluid head (in this case the O’Connor 1030 HD) That being said I found it incredibly useful to have the option of using the motorized system as well of course. You have very fine control of how fast or slow you want your slider/dolly (or tilt/pan/rotate) move to be. In fact you can add dampening (in effect ease in and ease out) to get moves that only an experienced dolly grip could do – but that I couldn’t if my life depended on it. I always seem to screw up long moves towards the end – all too often because I have to take a step or two in the middle of the move (or to be honest, I usually seem to trip on something or worse one of the tripod legs ..) or I am focusing so much about getting the motion just right AND panning perfectly at the same time. It’s not easy – especially if you’re under pressure or if you’re watching that once in a lifetime moment.
In terms of advice for live action (video) moves – the best thing I can share is to remember that every slider/dolly shot should have a perfect frame at the beginning AND at the end of each move.
Treat your start point (your "1") and your end point (your "2" position) as if they were each independent, perfect frames (or photographs.)
The truly masterful dolly shots happen when you can keep the frame interesting throughout the entire move. There should be no dead or boring spot during the entirety of the move.
I’ve also found that side to side (lateral) moves can become a bit repetitive. You should push yourself do try different angles. These sliders can also go vertical or in pretty much any orientation – making them incredibly versatile (and at times a great substitute for a JIB.)
Also – you seldom need as long of a slider as you might think… You’d be surprised at how effective a 3 foot slider move FORWARD toward your subject is – that’s what we did for the tree shot at the start of "Epic 308." We did that on a simple Cineslider with one motor a still head with a 17mm Tilt shift lens.
If you study that shot, you will see how well you can appreciate the forward motion on such a small dolly move. This is one of the keys of any slider or dolly shot: to have your audience appreciate depth as the camera moves through an environment – something you can’t do with pan and scan (zooming in post) or on a stationary tripod.
The effectiveness of your slider/dolly move has everything to do with two main factors: First a wide angle lens will always accentuate a forward or backward move (a push or a pull respectively) more than a standard or telephoto lens.
Second – you MUST have strong foreground subject (in this case the trees) middle ground subject (the fence) and background subjects (the distant tree atop the hill.) That will truly allow people to appreciate the full breadth of the move and feel the 3-dimensionality of the environment. I’ll take this kind of "3D feel" over "3D" any day! The moving stars in that shot are the cherry on top of course. The light you see coming at the end of the shot to the left is the moon rising by the way… I knew that was going to happen with the use of my Sunseeker app and was rewarded for that extra research if you will.
Keep in mind that no matter how perfectly thought out your time lapse is, what makes it truly "magical" is something unexpected… to see more of that check out this old time lapse also done on a Cineslider in Naples, Italy – you’ll see what I mean by the "unexpected" making your time lapses rise to the top. Or you can pretty much check out any of Tom Lowe’s work at Timescapes.org. The guy is awesome!
Rainbow Time Lapse – Napoli from Vincent Laforet on Vimeo.
As far as more time lapse tips – that will come in the next Behind the Scenes post. There’s a lot to talk about there as well – and I’ll go more into why I think it’s very hard to remain "competitive" with time lapses that don’t have the camera moving these days – and why motorized sliders have become essential. It’s mostly a function of how ubiquitous time lapse photography has become and how acccessible it is. That being said – there are many exceptions out there of a simple time lapse on a tripod of course! I want to thank Kessler Crane for funding this trip and the behind the scenes looks you’re getting here. You can help support them back by visiting them of course!
I also wanted to point out a few pieces of gear we used on this shoot – the Lite Panel 1X1 LEDs that were a HUGE help on this shoot (see the car time lapse with the stars) – the panels were powered for more than 3 hours on the Anton Bauer batteries we had on hand. We also borrowed Element Technica’s top and bottom plates for the epic for this shoot (huge thanks guys!) And I also borrowed an 11~15mm Duclos lens for the Epic – and the lens is the best bargain for your buck in the world – when you consider the incredible image quality it produces. A big thanks also goes to Schneider Optics for letting us test their Cine Xenar PL lenses. As you can see the purpose of this trip was to test out a variety of gear with some new ideas and techniques that can later be applied on commercial jobs. (Trying experimental things on big budget jobs is not always possible / wise – although when you do, you often get amazing results…)
I also shot many of my still images with the Hasselblad H4D 40 Megapixel camera – and found that the camera’s image quality was pretty stunning. As cameras like the Epic start to push into still territory – I find that many photographers are going to rely more and more on very high resolution backs to produce a distinct product that stands out from the rest. I’ve been a huge fan of the Canon 5D MKII and Canon 1Ds MKIII for years – but the resolution and depth you can get from a 40 Megapixel back is hard to ignore if you are in the business of making fine art prints. When you shoot HDR images – the results are stunning.
I’ve had a tremendous pleasure making large 60 X 40 prints off of these images and been very very impressed with the results. While many photographers will find 21 MP to be more than enough for their needs – I see portrait and fine art photographers gravitating to these larger backs over the next few year – again to distinguish themselves from the massesl. Let’s face it: it’s not uncommon to have a high school student or your hobbyist friend sporting a 12-21 MP camera these days is it? That being said and as well all know, it’s the photographer – not the camera – that makes the image.
See you all early next week with more.

